This functionality is turned on per client request. Please send your request to your Project manager.
Follow the steps below to enable a user to cancel their own registration without needing to contact an administrator.
Rules for User Cancelled Registration
- Only applicable to orders paid by credit card
- Users can only cancel their own registration if the entire order is cancellable. This means, all products in the order must have the Cancellation Allowed field set to “Yes”
- Users must be within the Attendee Cancellation Deadline timeframe, set in Step 1 below.
Users who wish to cancel their order but do not meet the above criteria must reach out to an administrator to inquire about cancelling.
Step 1: Global Meeting Times
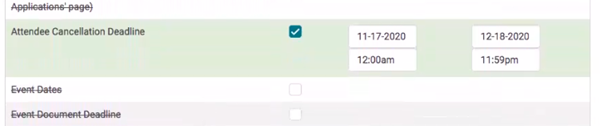
Under Settings > Meeting Times > Attendee Cancellation Deadline - Make sure this deadline is wide open.
1. Navigate to the Activity Dashboard > Activity Management > Meeting Times
2. Open "Attendee Cancellation Deadline" - This meeting time controls when users can cancel their registration for all all the orders that are allowed to be cancelled. The dates on this deadline can also be set in the future.
1. Go to the Registration tab > Manage Activity Products. If you have existing products open the product or add the registration products as you would normally.
2. Cancellation Allowed: This field is defaulted to “No”. Change this to “Yes”.
3. Cancellation Fee: Enter a cancellation fee, if applicable.

Step 3: Set the Attendee Cancellation Policy
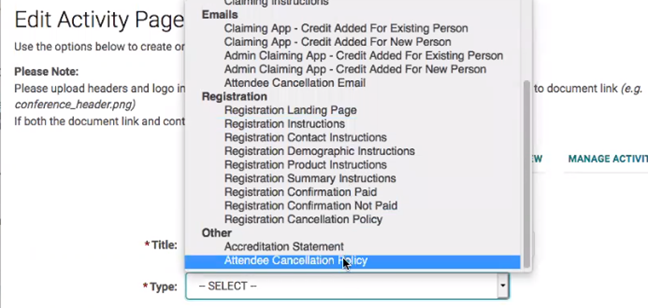
1. Go to Activity Management > Manage Activity Pages > Click “Add New”
2. In the Type field, select Attendee Cancellation Policy under “Other”
3. Enter your cancellation policy in the Content box.
Step 4: Set the Attendee Cancellation Email
1. From Manage Activity Pages > Click “Add New” again
2. In the Type field, select Attendee Cancellation Email under “Emails”
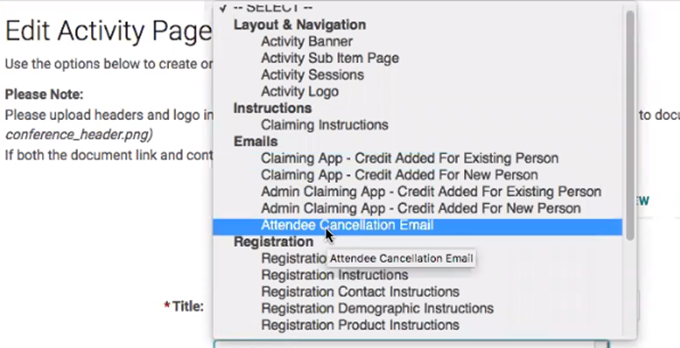
3. In the Email field, select the default “Attendee Order Cancelled.” If you prefer to have an Activity specific email, duplicate the “Attendee Order Cancelled” email and create a new one.
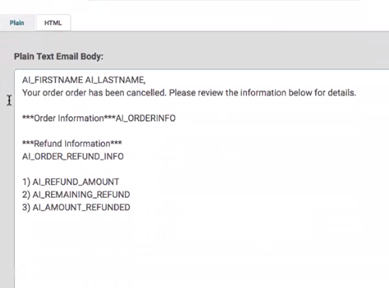
*Note, do not change any of the following email tags in the email template:
AI_ORDER_INFO
AI_ORDER_REFUND_INFO
AI_REFUND_AMOUNT
AI_REMAINING_REFUND
AI_AMOUNT_REFUNDED
4. If you would like an admin to be cc’d on cancellation emails, add the email address to the CC Address field on the email template.